基于 vuepress-theme-hope 搭建个人博客
基于 vuepress-theme-hope 搭建个人博客
一、创建项目模板
使用文件管理器打开对应文件夹,然后在上方的地址栏中输入 cmd 并按下回车。

在终端中执行下列命令:
npm init vuepress-theme-hope my-docs
这里的 my-docs 是一个参数,代表 VuePress Theme Hope 项目的文件夹名称。
执行完命令后根据提示,通过键盘 ↓ 选择 简体中文 并回车来按需选择。
项目命令
# 启动开发服务器
npm docs:dev
# 构建项目并输出
npm docs:build
# 清除缓存并启动开发服务器
npm docs:clean-dev
启动项目,浏览器输入 http://localhost:8080/ 查看效果

目录结构
.
├── .github (可选的) → GitHub 配置文件存放路径
│    └── workflow → GitHub 工作流配置
│         └── docs-deploy.yml → 自动部署文档的工作流
│
├── src → 文档文件夹
│    │
│    ├── .vuepress (可选的) → VuePress 配置文件夹
│    │    │
│    │    ├── dist (默认的) → 构建输出目录
│    │    │
│    │    ├── public (可选的) → 静态资源目录
│    │    │
│    │    ├── styles (可选的) → 用于存放样式相关的文件
│    │    │
│    │    ├── config.{js,ts} (可选的) → 配置文件的入口文件
│    │    │
│    │    └── client.{js,ts} (可选的) → 客户端文件
│    │
│    ├── ... → 其他项目文档
│    │
│    └── README.md → 项目主页
│
└── package.json → Nodejs 配置文件
二、配置项目
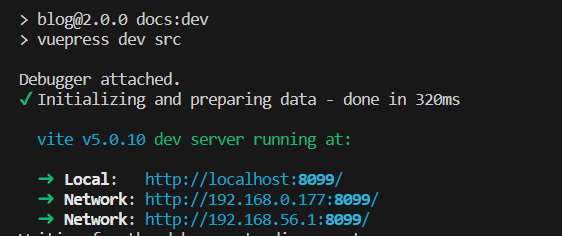
1、修改端口
项目默认启动端口为8080,如果想要修改为其他端口,在.vuepress/config.ts增加port即可:
// .vuepress/config.ts
export default defineUserConfig({
  port: 8099, //端口号
});
重新启动项目:
2、首页图片全屏设置
如果不想首页图片全屏,,打开README.md找到heroFullScreen修改为fasle
heroFullScreen: false
效果:
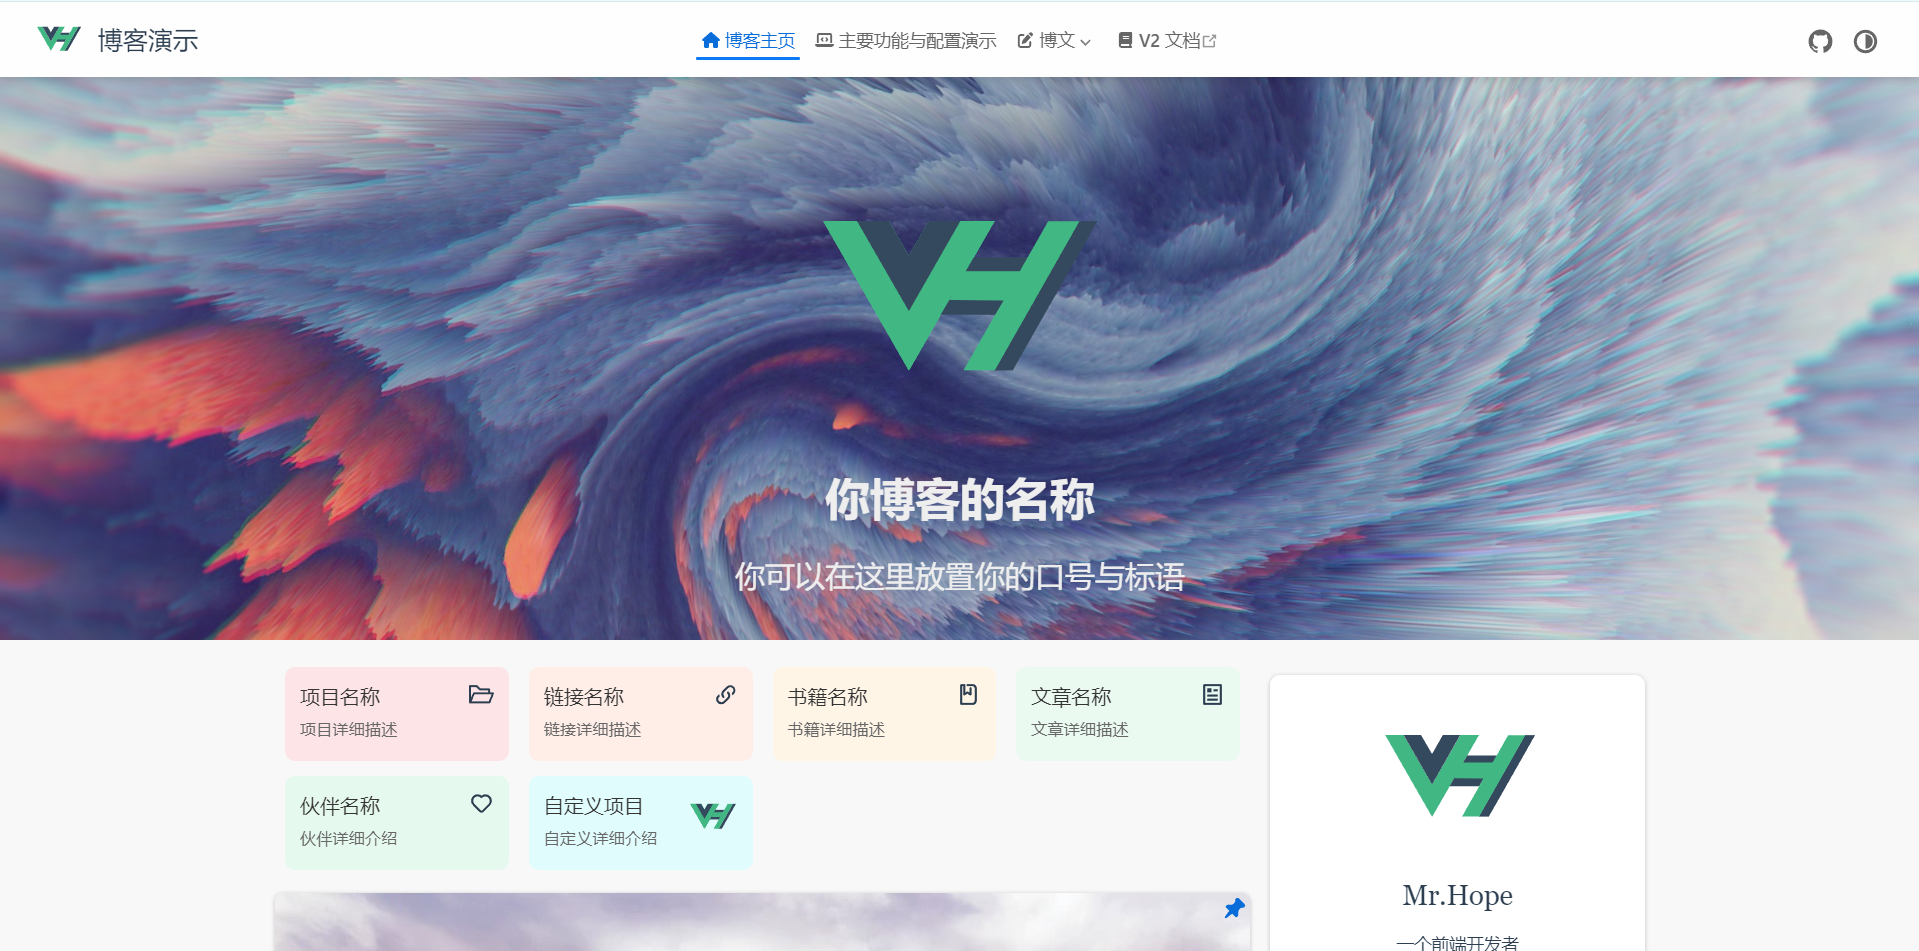
3、首页项目设置
初始化是会默认生成以下内容,如果要修改为自己的项目要怎么修改呢。

打开README.md,找到projects,编辑成你要的内容即可。
projects:
  - icon: project
    name: 项目名称
    desc: 项目详细描述
    link: https://你的项目链接

  - icon: link
    name: 链接名称
    desc: 链接详细描述
    link: https://链接地址

  - icon: book
    name: 书籍名称
    desc: 书籍详细描述
    link: https://你的书籍链接

  - icon: article
    name: 文章名称
    desc: 文章详细描述
    link: https://你的文章链接

  - icon: friend
    name: 伙伴名称
    desc: 伙伴详细介绍
    link: https://你的伙伴链接

  - icon: /logo.svg
    name: 自定义项目
    desc: 自定义详细介绍
    link: https://你的自定义链接
如果不想显示,直接把projects的内容全部删除即可,效果如图:

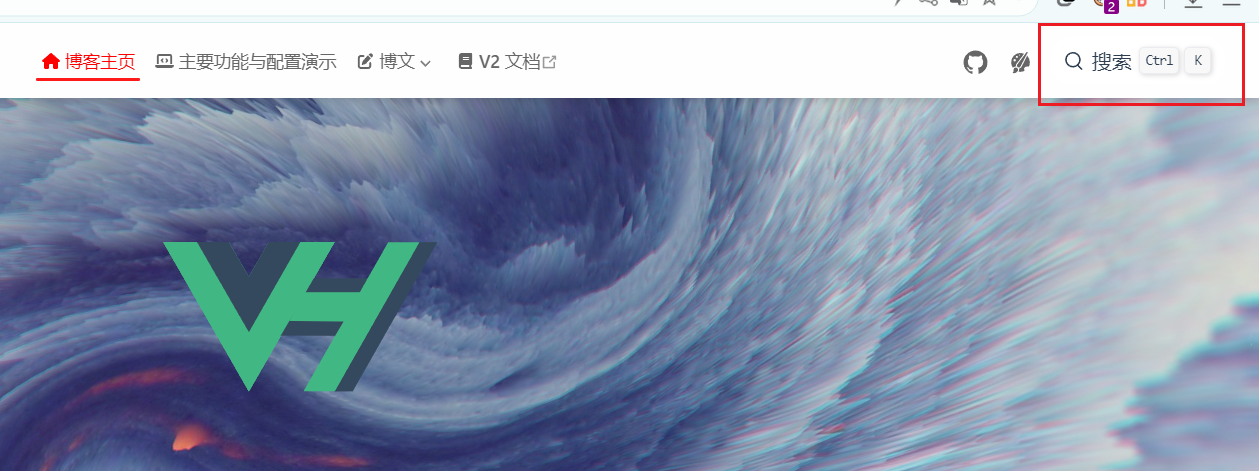
三、搜索功能
vuepress-theme-hope对 vuepress-plugin-search-pro、 @vuepress/plugin-docsearchopen in new window 和 @vuepress/plugin-searchopen in new window 提供了内置支持。只需要添加并配置所需的搜索插件,就能够在导航栏获得一个搜索框。
使用 vuepress-plugin-search-pro
1、安装 vuepress-plugin-search-pro
npm i -D vuepress-plugin-search-pro
2、从 vuepress-plugin-search-pro 导入 searchProPlugin 并将其应用至 config.{ts,js} 下的 plugins 选项.
// .vuepress/config.ts
import { defineUserConfig } from "vuepress";
import { searchProPlugin } from "vuepress-plugin-search-pro";

export default defineUserConfig({
  plugins: [
    searchProPlugin({
      // 索引全部内容
      indexContent: true,
      // 为分类和标签添加索引
      customFields: [
        {
          getter: (page) => page.frontmatter.category as any,
          formatter: "分类:$content",
        },
        {
          getter: (page) => page.frontmatter.tag as any,
          formatter: "标签:$content",
        },
      ],
    }),
  ],
});
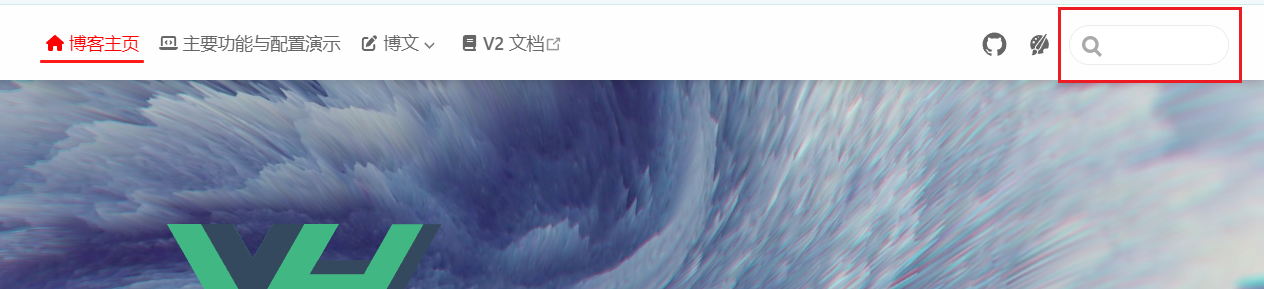
效果:
更多
关于搜索插件的可用选项,详见 插件文档。
使用 @vuepress/plugin-search
安装 @vuepress/plugin-search
npm i -D @vuepress/plugin-search@next
从 @vuepress/plugin-search 导入 searchPlugin 并将其应用至 config.{ts,js} 下的 plugins 选项.
// .vuepress/config.ts
import { defineUserConfig } from "vuepress";
import { searchPlugin } from "@vuepress/plugin-search";

export default defineUserConfig({
  plugins: [
    searchPlugin({
      // 你的选项
    }),
  ],
});
效果:
更多
关于搜索插件的可用选项,详见 插件文档。
四、导航栏
1、导航栏链接
在开始之前你需要明确,你的导航栏需求是啥样的。
导航栏的相关设置在 .vuepress/navbar.ts文件中。
默认为字符串,对应 src 目录下的文件路径,你可以省略 .md扩展名,以 / 结尾的路径会被推断为 /README.md。
例如:
import { navbar } from "vuepress-theme-hope";

export default navbar([
  "/", // 对应首页,即src/README.md
  '/react/', // 对应src/react/README.md
]);
也可以是对象,基本格式如下:
import { navbar } from "vuepress-theme-hope";

export default navbar([
  {
    text: "博文",
    icon: "pen-to-square",
    prefix: "/posts/", // 对应 src/posts 目录
    children: [
      {
        text: "苹果",
        icon: "pen-to-square",
        prefix: "apple/", // 对应 src/posts/apple 目录
        children: [
          { text: "苹果1", icon: "pen-to-square", link: "1" },
          { text: "苹果2", icon: "pen-to-square", link: "2" },
          "3",
          "4",
        ],
      },
      "tomato",
      "strawberry",
    ],
  },
  {
    text: "V2 文档",
    icon: "book",
    link: "https://theme-hope.vuejs.press/zh/", // link代码外链地址
  },
]);
假如我要修改成这样效果的导航栏:
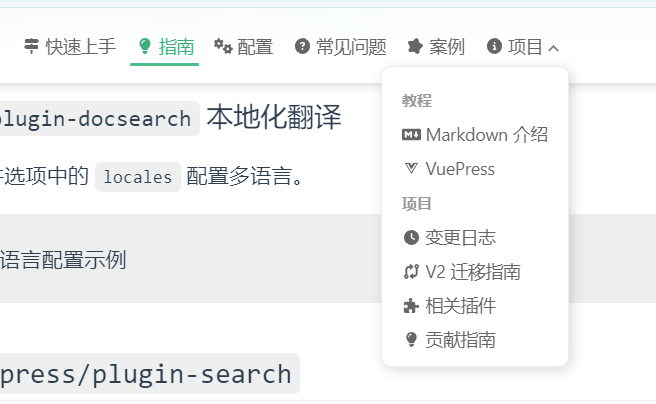
具体配置如下:
// .vuepress/navbar.ts
import { navbar } from "vuepress-theme-hope";

export default navbar([
  {
    text: "快速上手",
    link: "/get-started/",
  },
  {
    text: "指南",
    link: "/guide/",
  },
  {
    text: "配置",
    link: "/config/",
  },
  {
    text: "常见问题",
    link: "/faq/",
  },
  {
    text: "案例",
    link: "/demo/",
  },
  {
    text: "项目",
    children: [
      {
        text: "教程",
        children: [
          { text: "Markdown 介绍", link: "/Markdown 介绍" },
          { text: "Vuepress", link: "/Vuepress" },
        ],
      },
      {
        text: "项目",
        children: [
          { text: "变更日志", link: "/变更日志" },
          { text: "迁移指南", link: "/迁移指南" },
        ],
      },
    ],
  },
]);
2、禁用导航栏
你可以在主题选项中设置 navbar: false 来禁用所有页面的导航栏:
// .vuepress/config.ts
import { defineUserConfig } from "vuepress";
import { hopeTheme } from "vuepress-theme-hope";

export default defineUserConfig({
  theme: hopeTheme({
    navbar: false,
  }),
});
假如你不想某个Markdown页面显示导航栏,你也可以通过 YAML front matter 来禁用某个指定页面的导航栏:
---
navbar: false
---
更多
关于导航栏的介绍,详见导航栏文档
五、侧边栏
1、全局侧边栏配置
你可以设置侧边栏导航和导航栏的路由一一对应,这样就相当于是全局的侧边栏.。
对于侧边栏的具体条目,可以通过设置children: "structure"根据当前目录下的文件名称自动生成。
// .vuepress/sidebar.ts
import { sidebar } from "vuepress-theme-hope";

export default sidebar({
  "/": [
    {
      text: "快速上手",
      prefix: "get-started/",
      children: "structure",
    },
    {
      text: "指南",
      prefix: "guide/",
      children: "structure",
    },
    {
      text: "配置",
      prefix: "config/",
      children: "structure",
    },
    {
      text: "常见问题",
      prefix: "faq/",
      children: "structure",
    },
    {
      text: "案例",
      prefix: "demo/",
      children: "structure",
    },
    {
      text: "项目",
      children: [
        {
          text: "教程",
          children: [
            { text: "Markdown 介绍", link: "Markdown 介绍" },
            { text: "Vuepress", link: "Vuepress" },
          ],
        },
        {
          text: "项目",
          children: [
            { text: "变更日志", link: "变更日志.md" },
            { text: "迁移指南", link: "迁移指南.md" },
          ],
        },
      ],
    },
  ],
});
还有另外一种方法就是把theme.ts中的sidebar注释掉,vuepress-theme-hope 会自动根据文件夹生成默认的全局侧边栏配置。
// .vuepress/theme.ts
export default hopeTheme({
  // 注释掉,会自动生成全局侧边栏配置
  // sidebar
});
2、分离式侧边栏
分离式菜单配置更简洁,如下所示:当设置structure时,默认根据目录下的文件自动生成侧边栏。
import { sidebar } from "vuepress-theme-hope";

export default sidebar({
  "/get-started/": "structure",
  "/guide/": "structure",
  "/config/": "structure",
  "/faq/": "structure",
  "/demo/": "structure",
});
更多
关于侧边栏的介绍,详见侧边栏文档
六、代码提交 GitHub 部署
1、GitHub创建仓库
首先登录 GitHub 创建一个空的仓库。
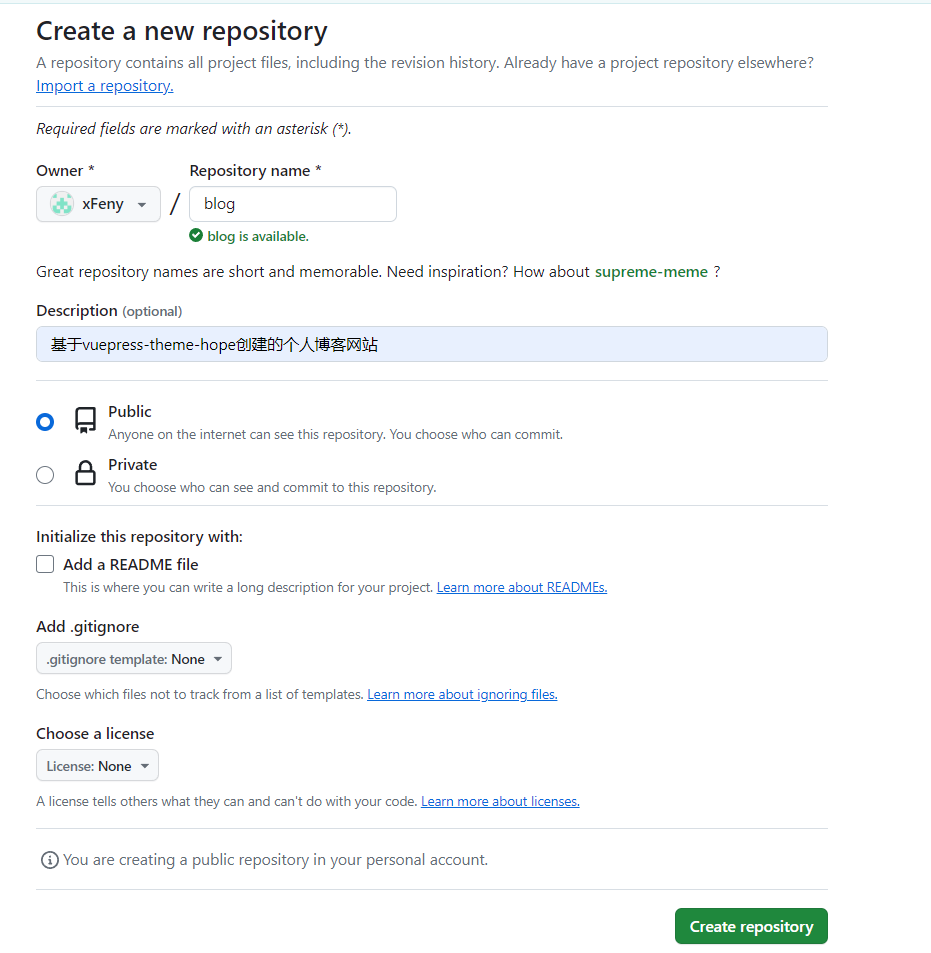
仓库名填写自己喜欢的,点击Create repository。
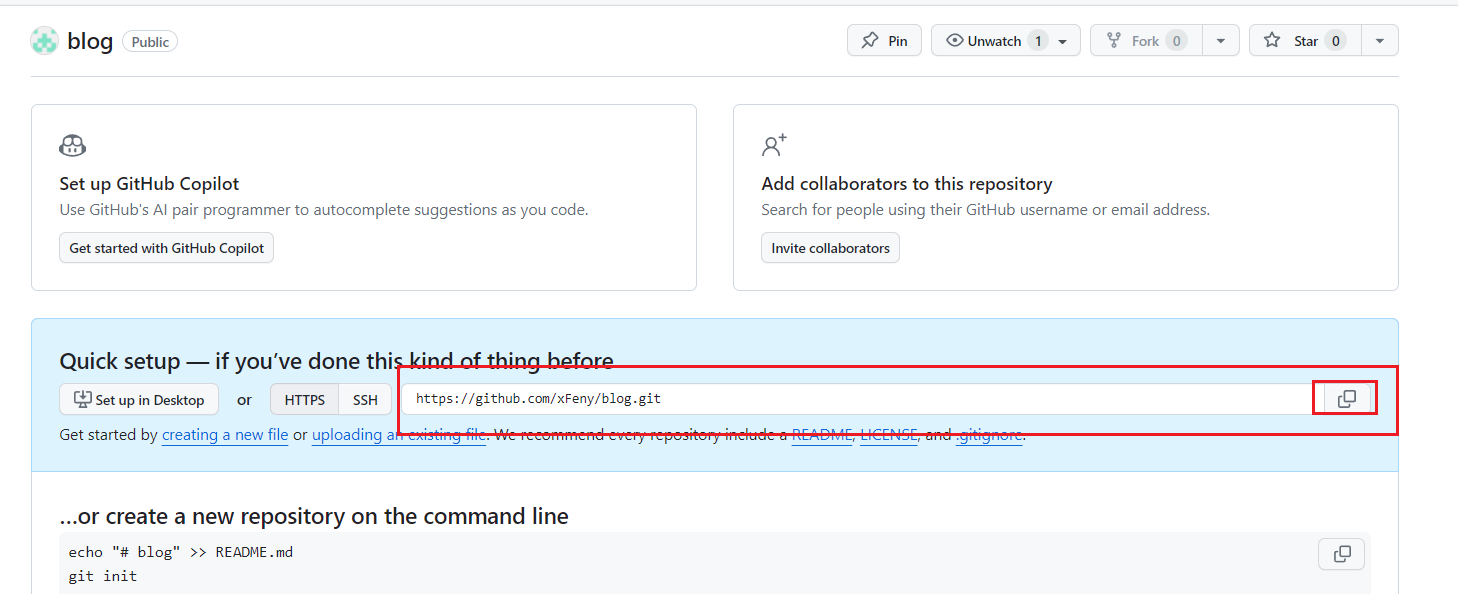
复制仓库地址:
注意
如果准备发布到
https://<USERNAME>.github.io/,你必须将整个项目上传至https://github.com/<USERNAME>/<USERNAME>.github.io仓库。在这种情况下无需进行任何更改,因为.vuepress/config.ts中 base 默认就是"/"。如果你的仓库地址是一个普通的形如
https://github.com/<USERNAME>/<REPO>的格式,网站将会被发布到https://<USERNAME>.github.io/<REPO>/,也就是说,需要将.vuepress/config.ts中 base 设置为"/<REPO>/"。
2、创建 .gitignore 文件
在项目根目录下创建.gitignore文件,添加如下内容,忽略不必要的提交项:
node_modules/
dist
.temp
.cache
3、本地项目上传 GitHub
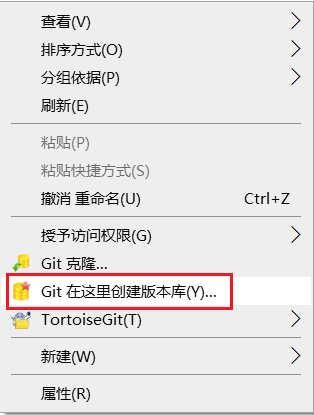
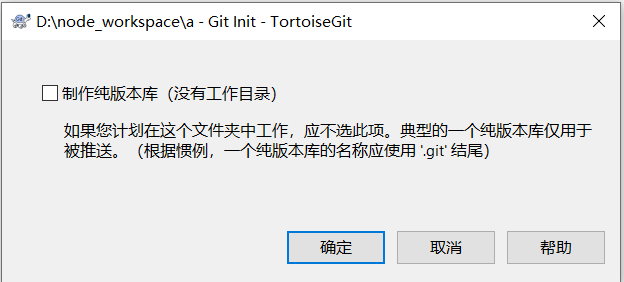
上传 GitHub 前请确保本地已安装好了Git和TortoiseGit 工具。
在本地项目根目录上鼠标右键--找到Git 在这里创建版本库。
点击确定
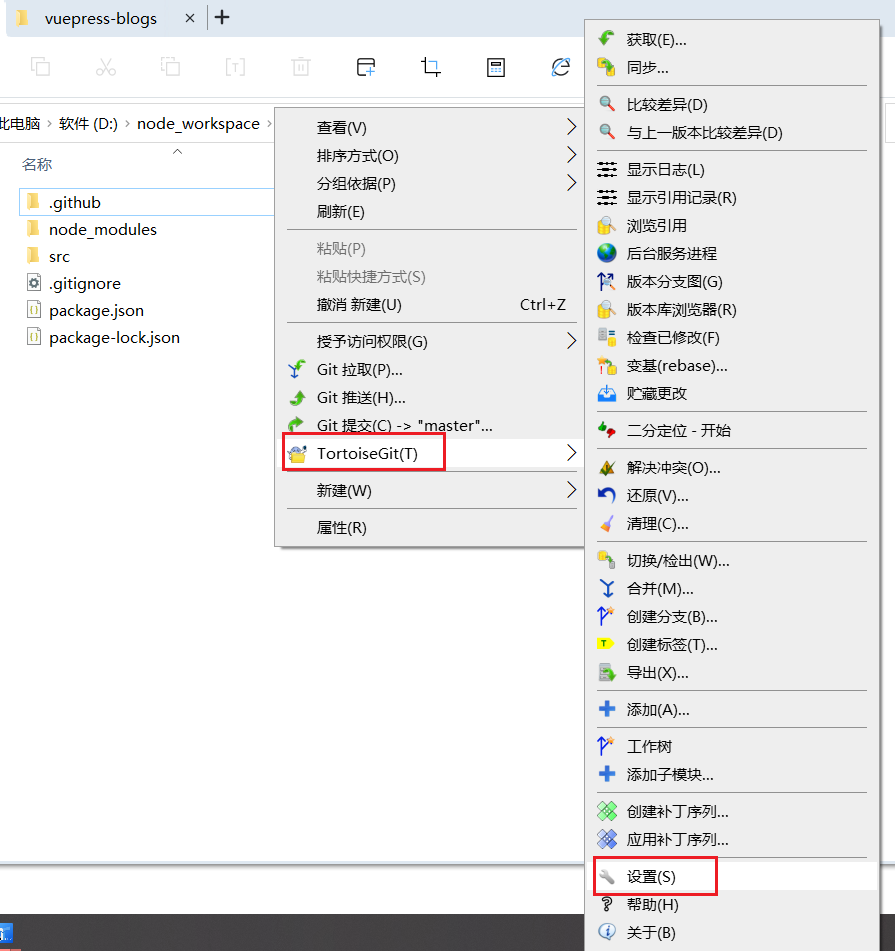
继续鼠标右键,选择TortoiseGit 设置 。
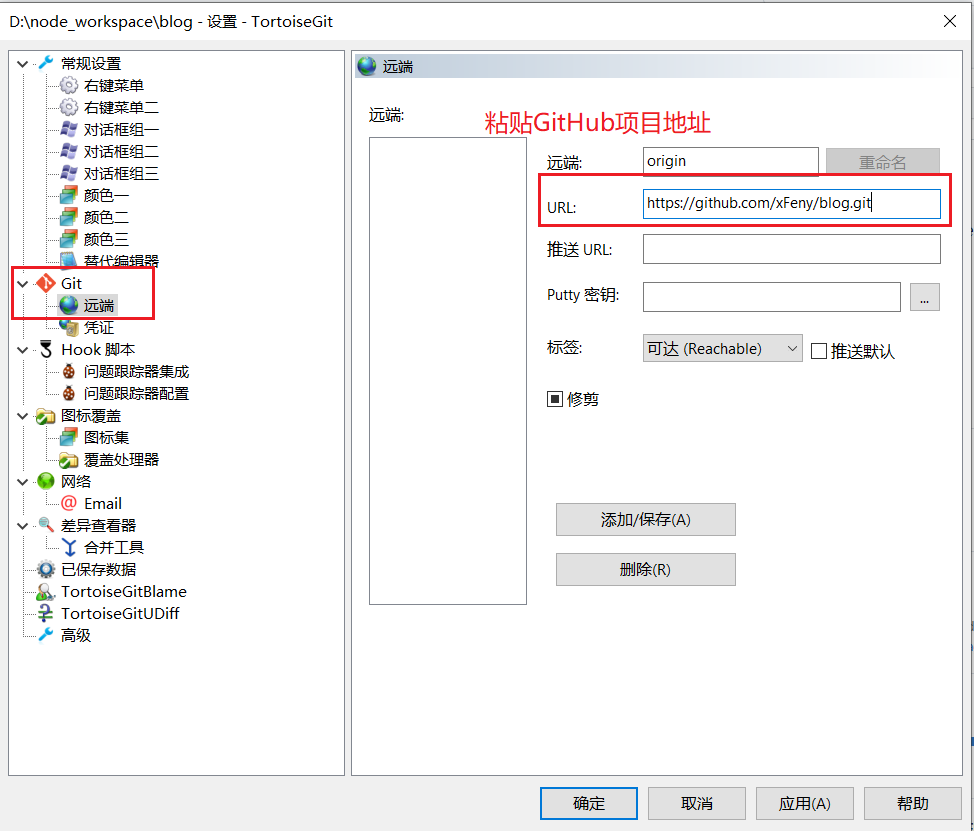
把复制到的GitHub 仓库地址复制到下图所示,点击确定:
鼠标右键进行提交代码
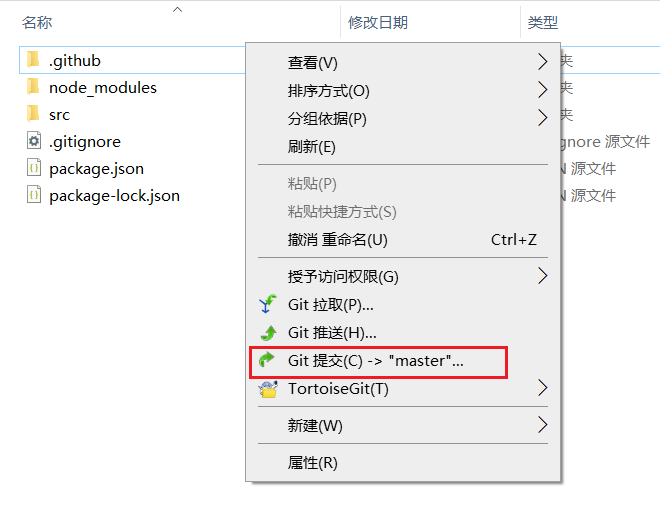
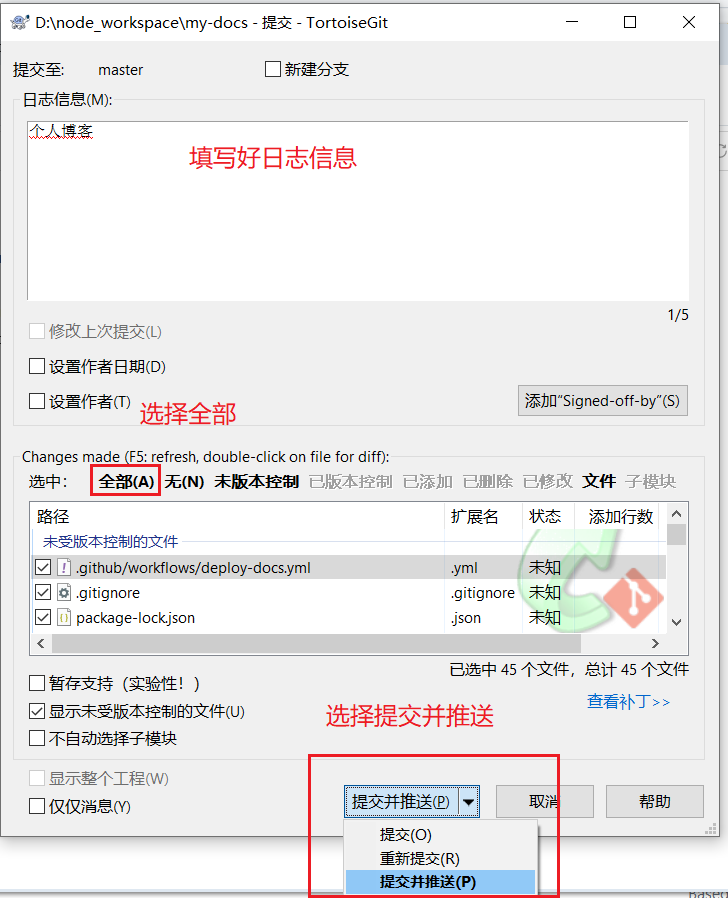
填写日志信息,选择全部,提交并推送。
在弹出框中点击管理:
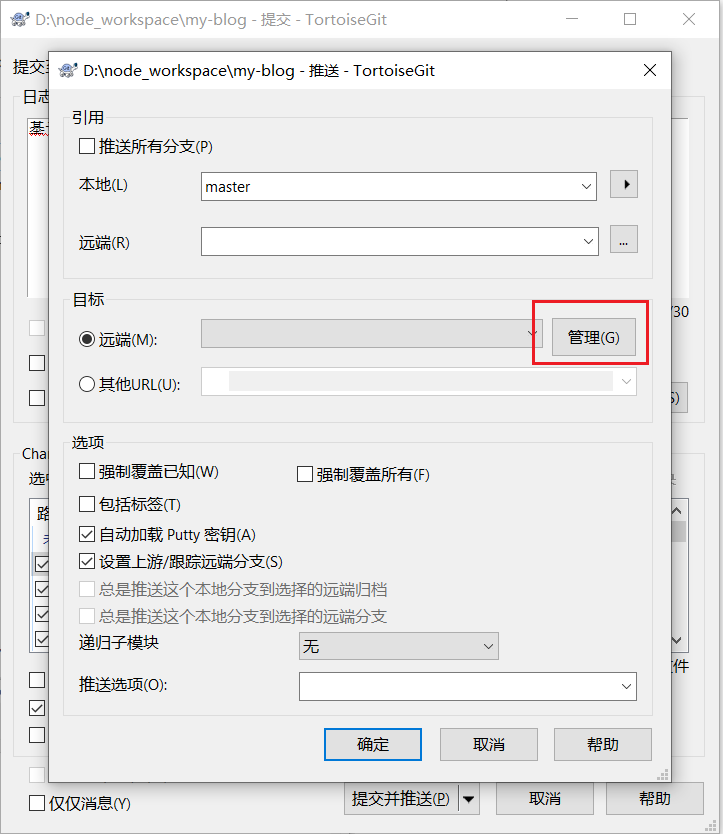
输入GitHub仓库地址,点击确定:
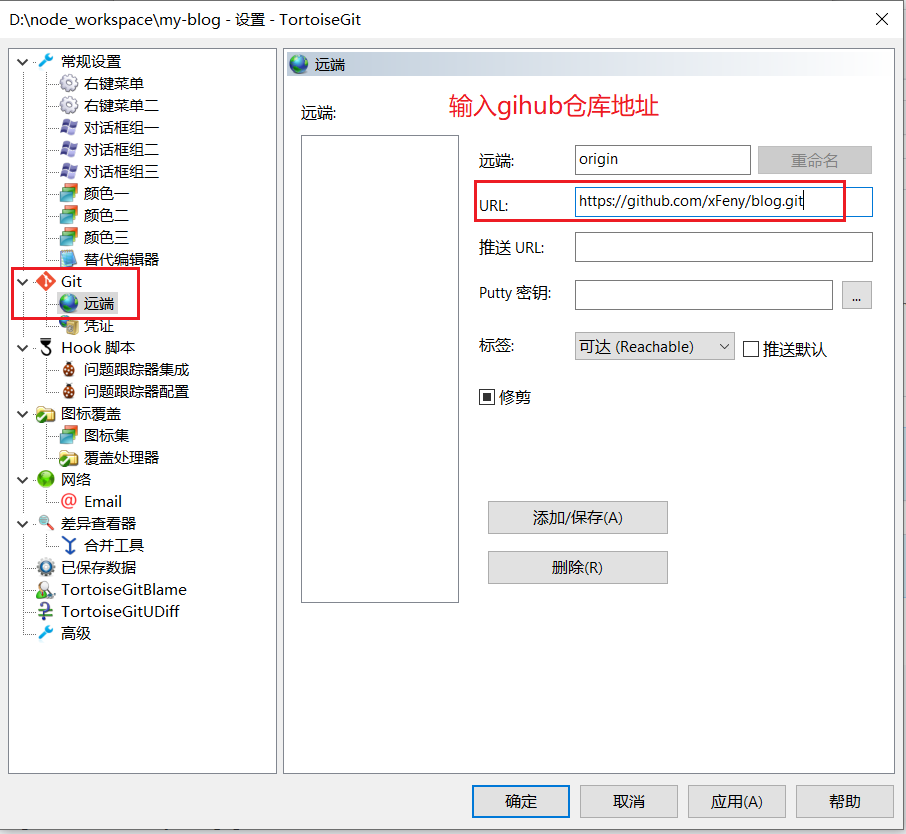
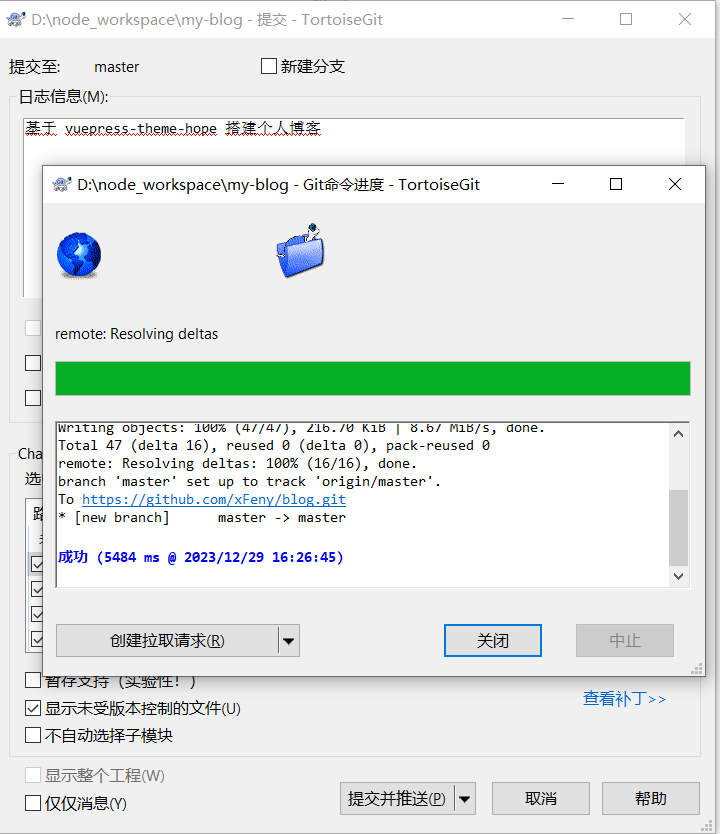
点击确定回来后再点击确定,如下图即表示成功:
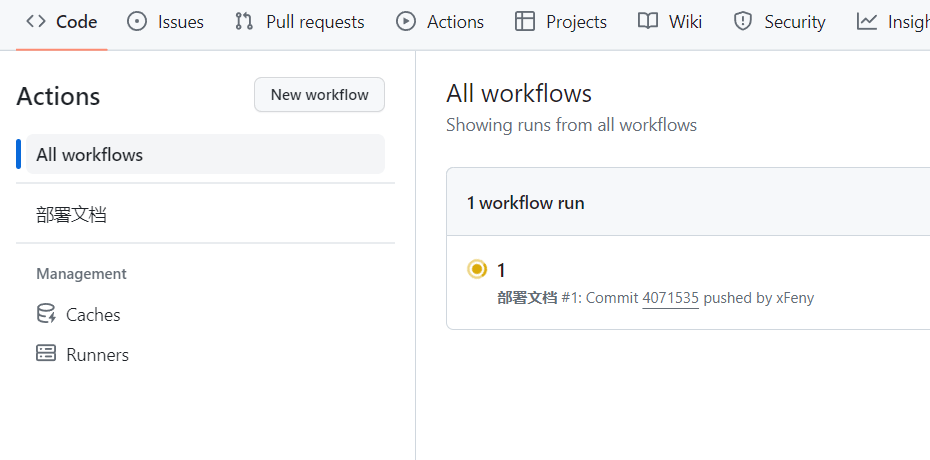
4、自动部署遇到的问题
代码提交GitHub,查看Actions发现自动化脚本并没有执行。
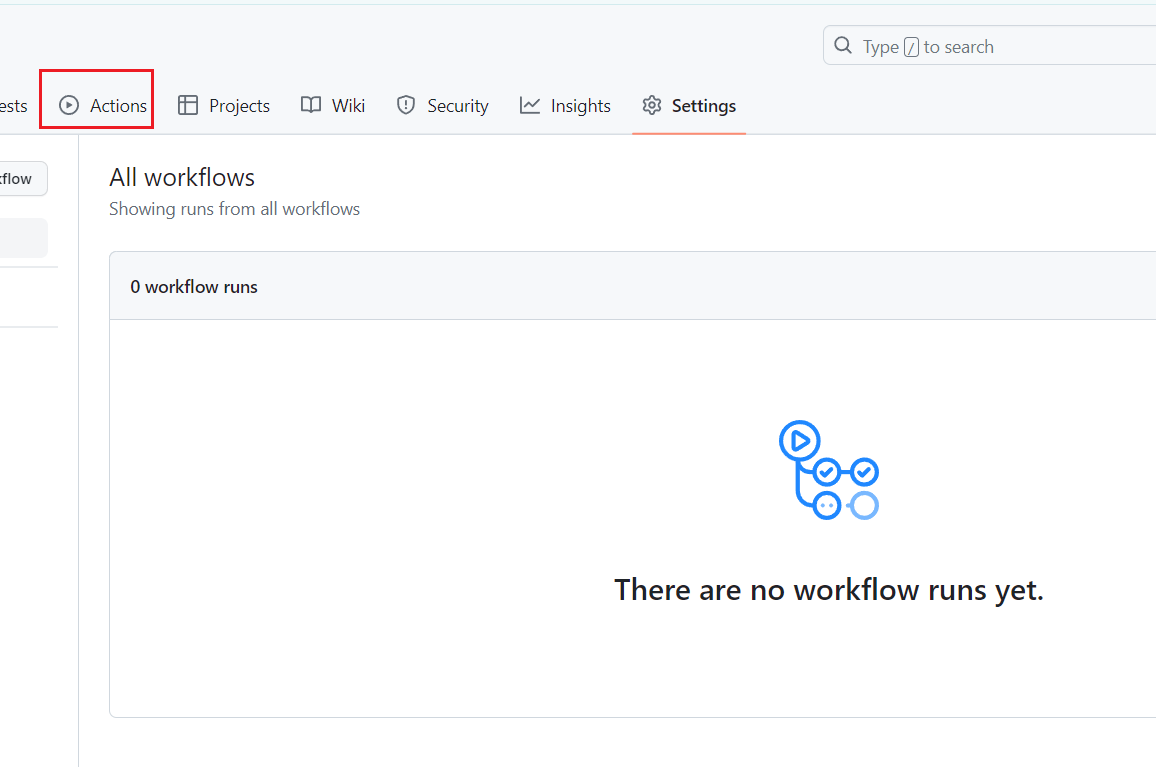
原因时github/workflows/deploy-docs.yml中的分支名称和仓库名称不一致:
# github/workflows/deploy-docs.yml
on:
  push:
    branches:
      # 确保这是你正在使用的分支名称
      - main
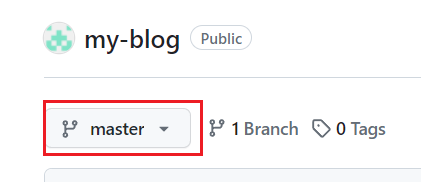
可以修改github/workflows/deploy-docs.yml的,也可以修改仓库名,我这里修改仓库名。
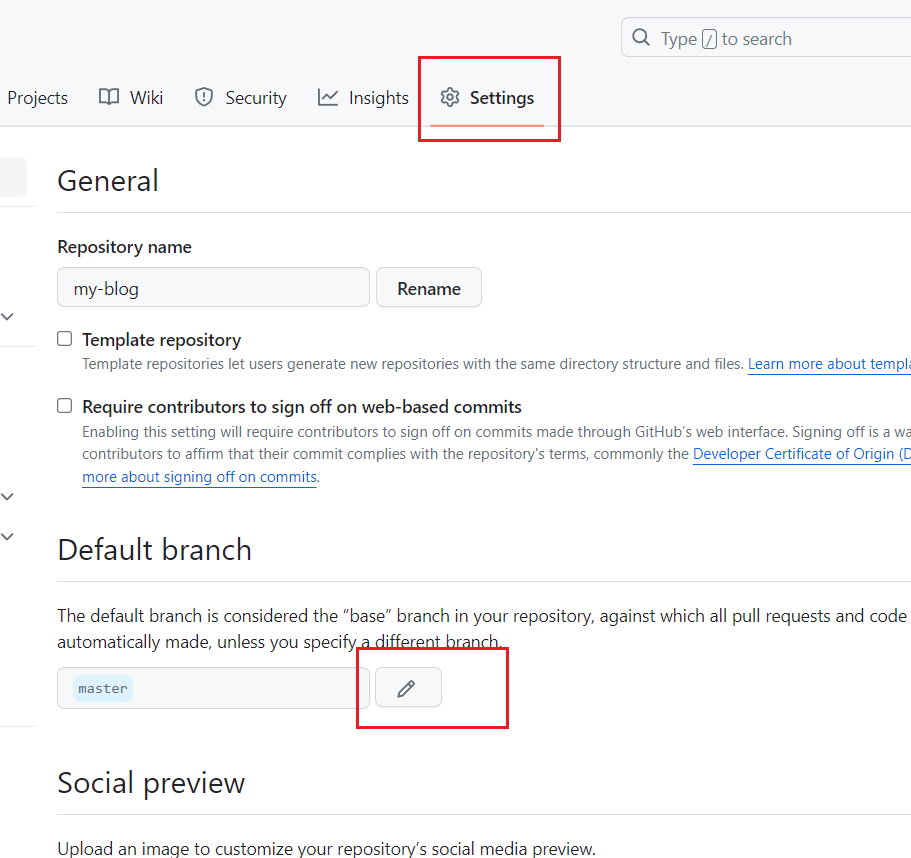
修改成一直后即可看到Actions执行了自动部署。
5、静态页资源访问
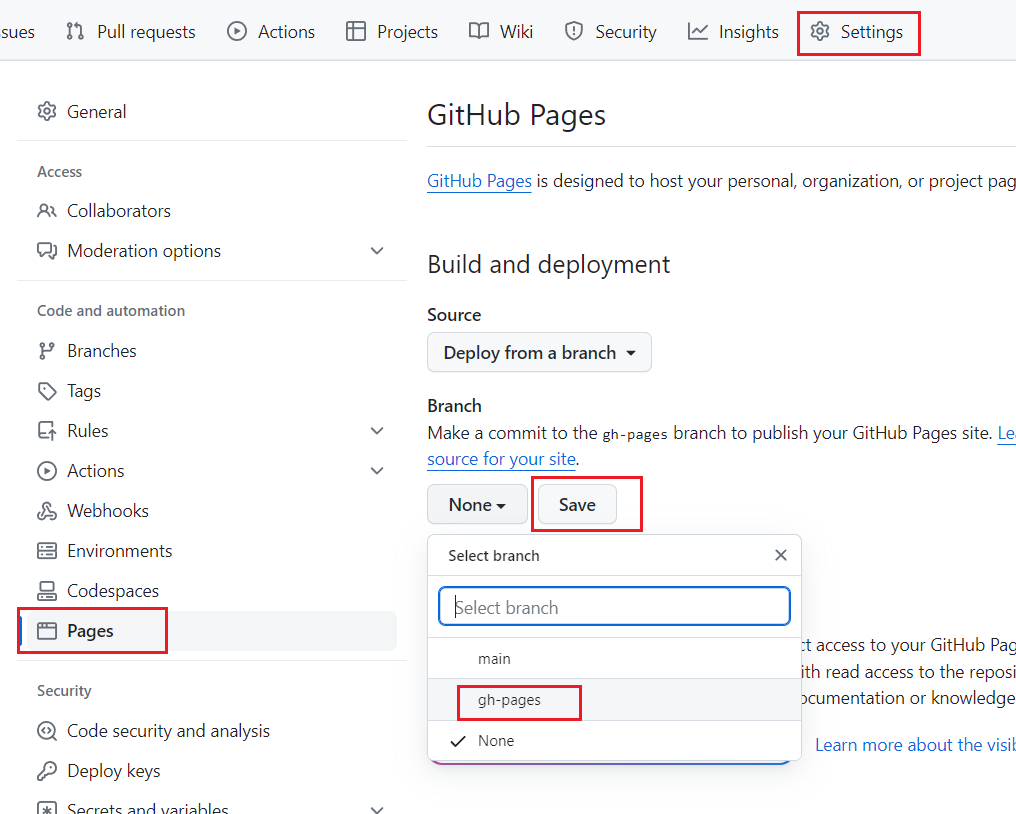
部署完成会自动创建一个gh-pages分支。
点击Setting--Pages进行设置,选择gh-pages分支,点击Save。
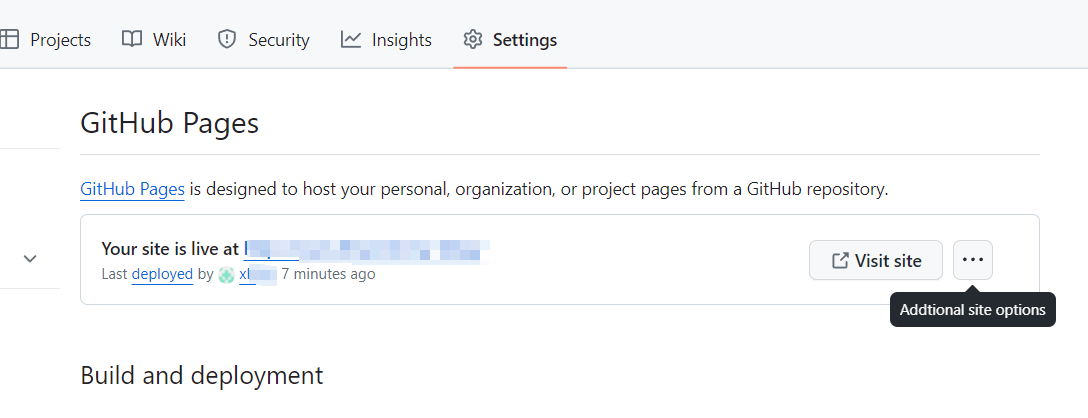
打开图片所示的地址,查看效果:
export default defineUserConfig({
  base: "/",
});
到这里整个基于 vuepress-theme-hope 搭建个人博客就完成啦!